Main

Dev Archives

11.07.08

Status

It’s been a long time since I last updated the blog. I have been really busy creating the in-house application (here at innoq) for invoice management and time reporting. And as this is my diploma thesis, too, I’m now occupied with writing the thesis.

“innoVoice”: that’s the title of the application (or at least the working title).
The app is now up and running for approx. 50 days and is in production mode concerning the management of invoices. The time reporting part is being tested by co-workers this month.

As you may have followed my design mockups of the time reporting screen, I thought I’d share the (for now) final design:

Note to self: I should update this blog more regularly!

29.04.08

Lesson learned

A part of my ER-Model is not correct:

The many-to-many association between Projects and Users is simply wrong. Imagine a simple case of an deletion of a relation between an User and a Project - for example the user/employee stopped working on that particular project - causes the project also to disappear from Timereports in the past.
And this is fundamentally wrong, because he surely did work on that project!

And so the connection should be between Projects and Timereports!!! Like this:

I’m pretty sure this has to be modelled this way.
Now if the user stops working on a particular project, it’s no problem to do that deletion.

Project has_many :timereports, :through => :projects_timereports
######
Timereport has_many :projects, :through => :projects_timereports
######
ProjectsTimereports has_many :timereportentries

Ok, now I’ll have to re-code that and I hope it won’t me drive nuts to do this, because I really could have avoided it!

23.04.08

ActiveResource and Associations

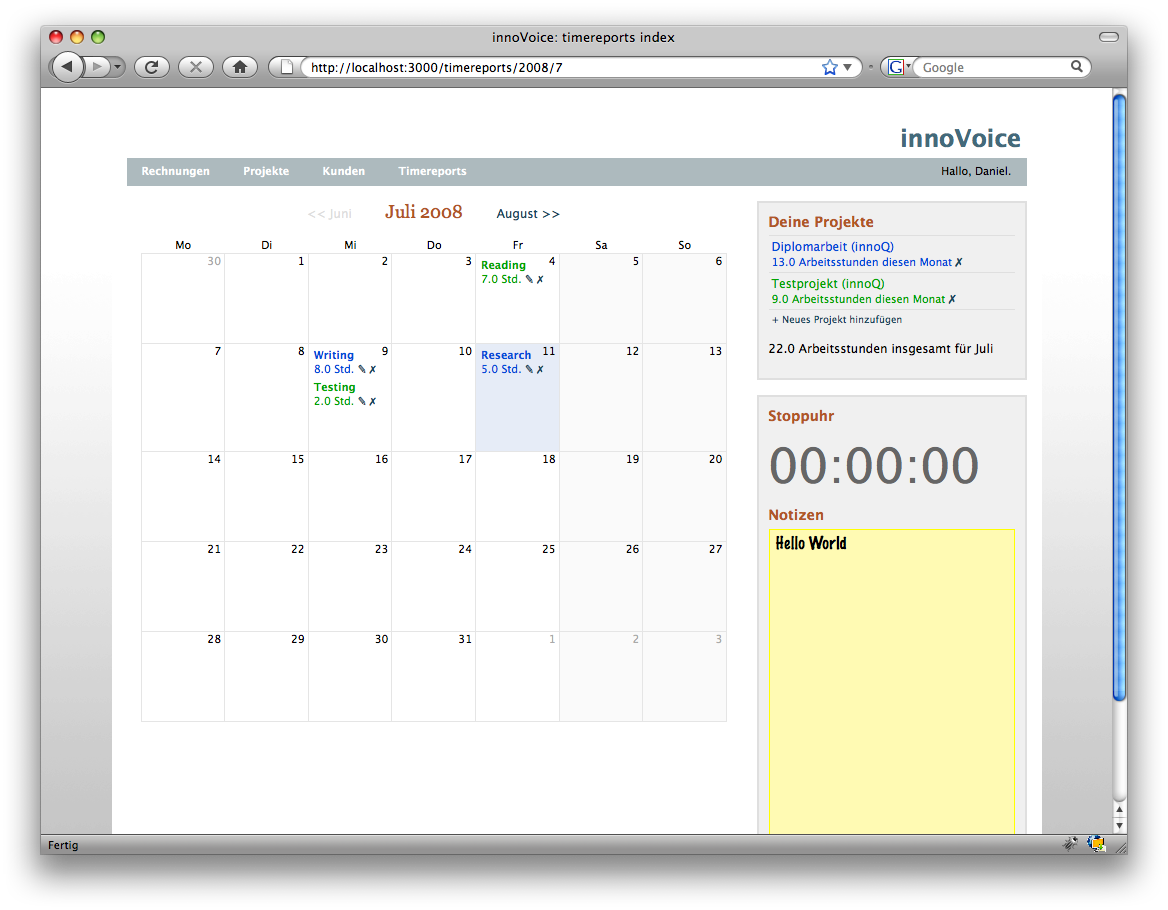
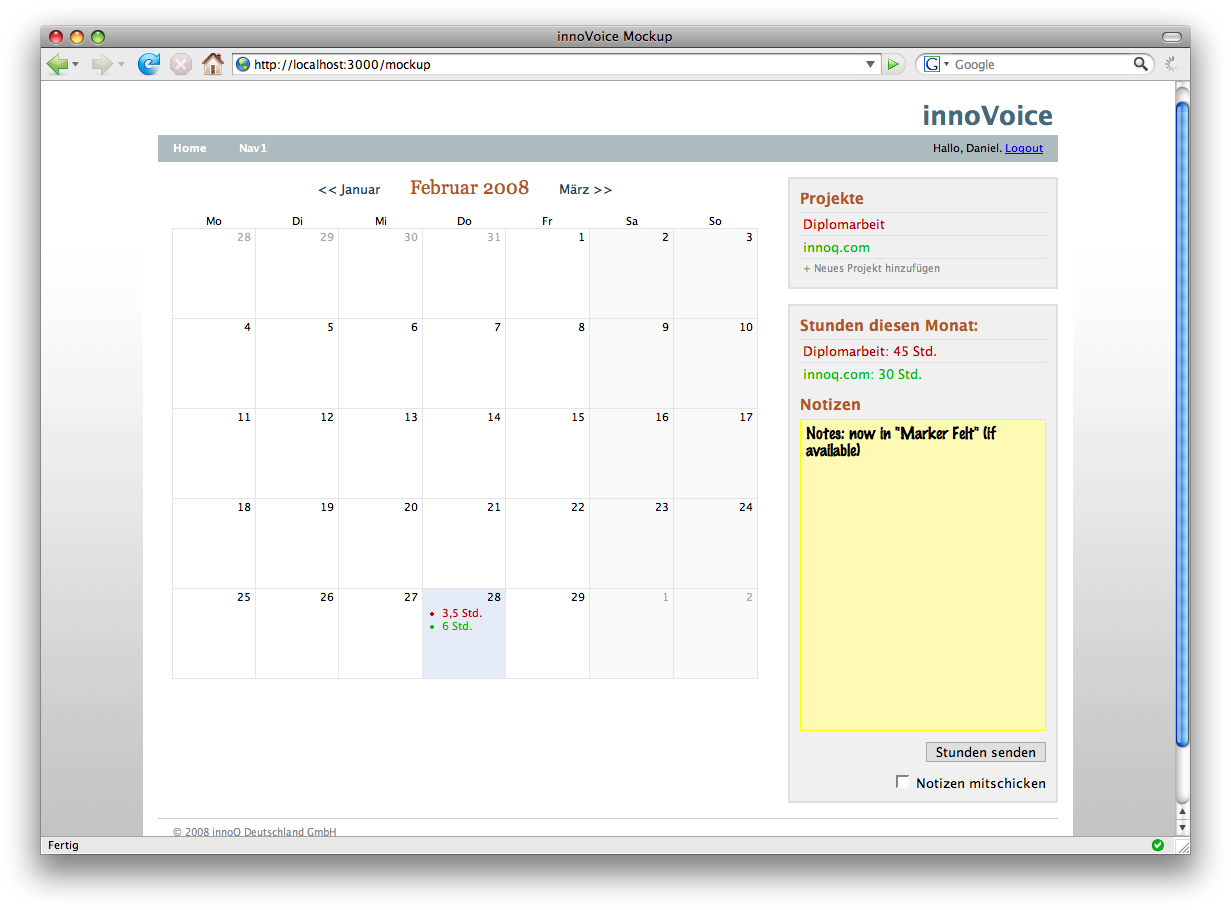
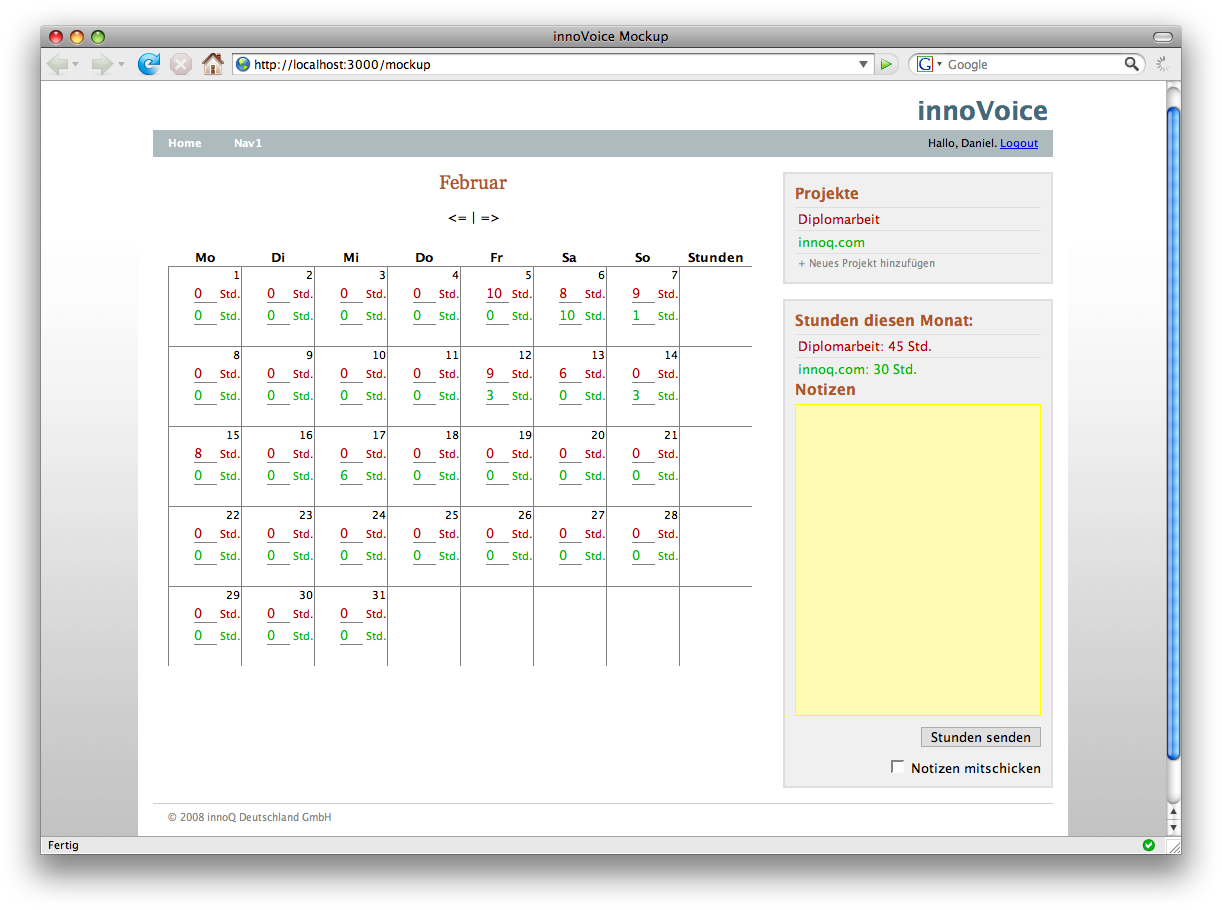
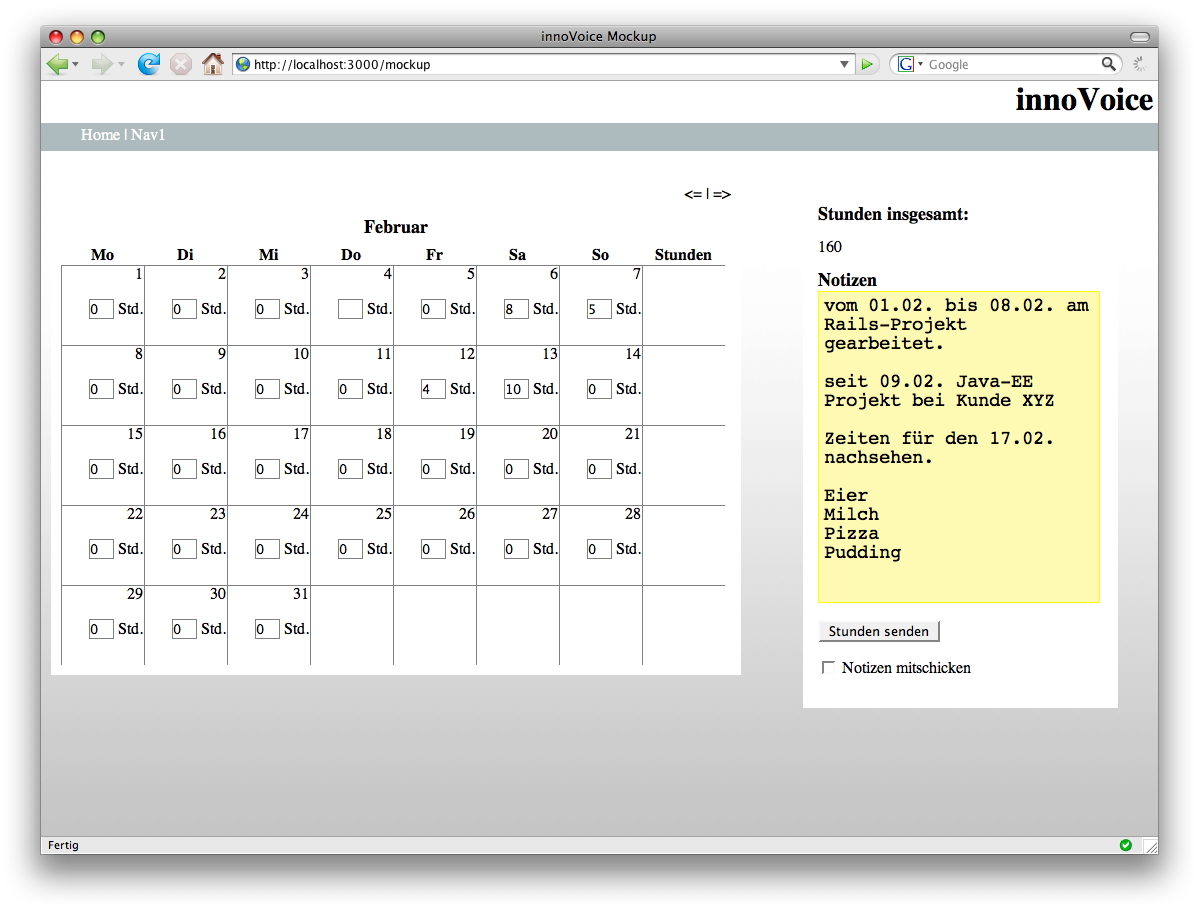
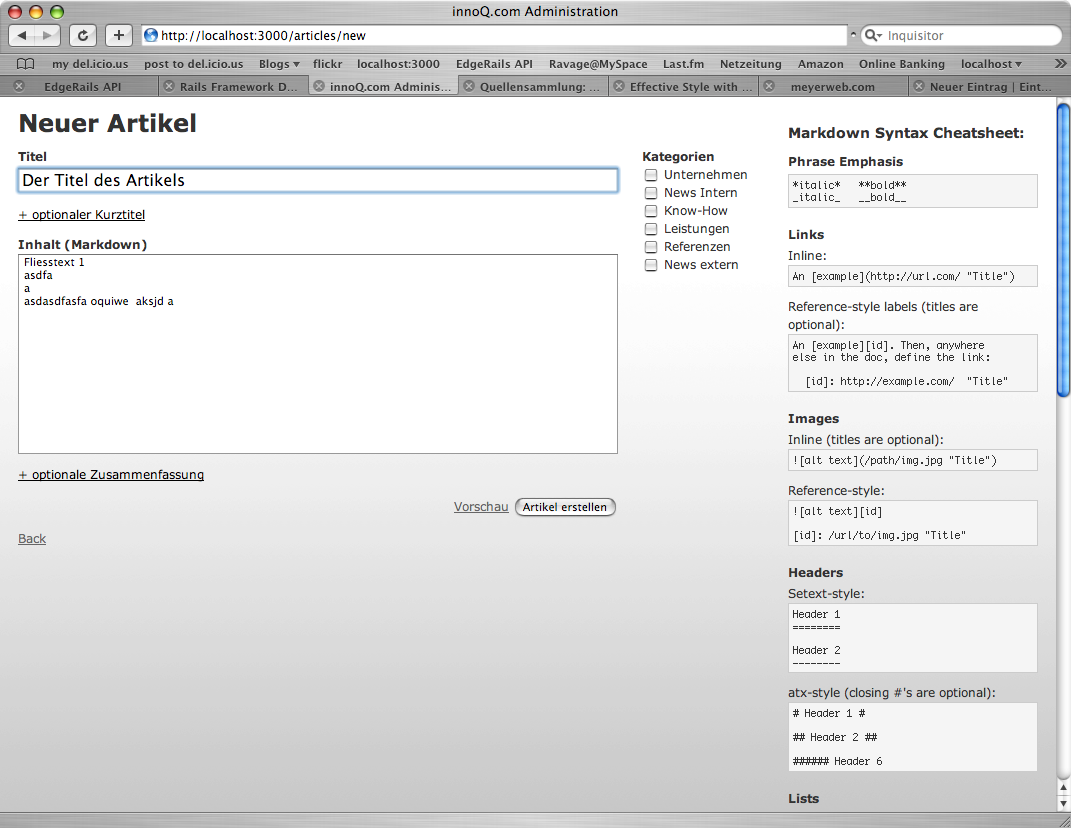
Ok, it’s been quite a while since the last post popped up here; that’s because I struggled with the innoQ internal timereporting- and invoicing-application I’m working on, which is my diploma thesis, too.
And here’s one of my problems I had…

Preface

Concerning users that are going to use my application, there has been a change made, so my app is no longer responsible for user management. This is now all done by a separate application. And this applications has a REST interface which I have access to and should obtain my user data from, as well as handle authentication. I now look at the “obtain data” part, because the authentication part is definitely worth another blog post.

ActiveResource basics

Now: receiving data from another Rails app with a REST interface is quite simple. In the model (in my case User) you inherit from ActiveResource::Base instead of ActiveRecord::Base and specify a site url to the remote Rails application. Like this:

class User < ActiveResource::Base
    self.site = "http://the.url.to/yourapp/"
end

Now you can obtain user data almost the same way you do with ActiveRecord classes:

User.find(2) # finds the user with the id of '2'

or even

User.find(:all) # finds all users in the remote app

if you like.

My problem

But what if your resource is somehow associated with your local model and database?
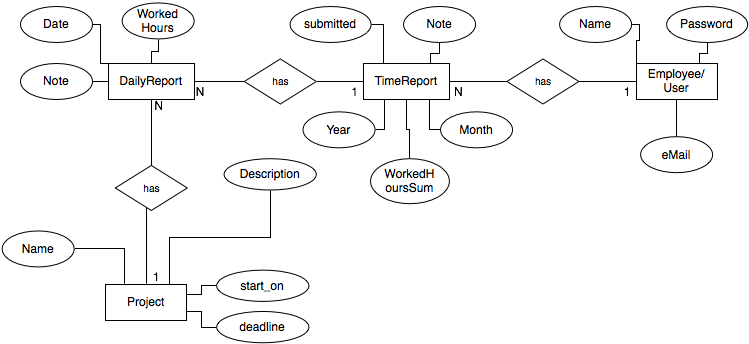
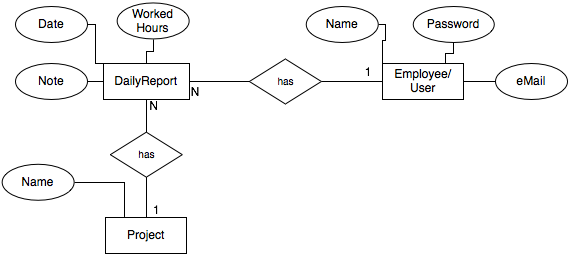
In my case an user has many projects and a project has many users. So here you have a many-to-many relationship.

That really is more difficult for problems like “I’d like to obtain all users for a specific project” and vice versa, because you can’t just make up a many-to-many relationship as you would with two ActiveRecord objects. Like this:

has_and_belongs_to_many :projects # or
has_many :projects, :through => 'projects_users'

In a class which inherits from ActiveResource this is not supported/allowed.
Ok, in my project model these statements would work, because it is an ActiveRecord object. But all the methods you gain through this won’t work either, because they don’t know the you are referencing a model of type ActiveResource and all finds will fail.

So what to do?
Here’s what works for me (so far).
But I’m sure there are many more ways out there to solve this, and I’d really appriciate every comment on this topic, ‘cause I am curious if there’s a more elegant solution. So, there you go:

My solution

Remember the initial situation:

Project (ActiveRecord - in my app) (M)—————-(has)—————(N) User (ActiveResource - remote app)

So first of all I created a join table and the corresponding join model by typing (in the console, of course):

script/generate model projects_users

This creates a model for me with along with a migration file. Inside this file I write these lines:

class CreateProjectsUsers < ActiveRecord::Migration
  def self.up
    create_table :projects_users do |t|
      t.integer :project_id, :user_id, :null => false
      t.string :color, :null => false
    end
  end

  def self.down
    drop_table :projects_users
  end
end

An advantage of join models is that you can store additional attributes in the join table. The only thing I store along the project_id and the user_id is a color. That’s just relevant for the front-end to display the project in the correct color, so don’t get irritated. ;-)

Then, I ran the migration:

rake db:migrate

Now, let’s head over to the association part.
As you can’t put any associations in a ActiveResource model, there’s nothing to do in the User model.

In the Project model I put a has_many statement:

has_many :projects_users, :class_name => "ProjectsUsers"

(Note, that in my case I had to explicitly tell the class_name of the join model class, because Rails assumes this to be singular, i.e. ProjectUser.)

In the ProjectsUsers model I wrote the following two lines:

belongs_to :project
belongs_to :user # so far this isn't used by me, but it may be useful some day

Now the interesting part: How can you get all users for a given project in a way like project.users.find(:all)?
In project.rb, define a method called users:

def users
    user_ids = self.projects_users.find(:all, :select => "user_id")
    users = user_ids.collect { |projects_users| User.find(projects_users.user_id) }
end

Now via project.users you’ll get all the users you need.
(I’m pretty sure you can rewrite this, so that it works the railsway and you can call project.users.find(:all) instead, but I haven’t tried it, yet)

Ok, the other way round, meaning obtaining all projects for a specific user, I faked it a bit, and I’m sure you can do better here, too. But it works!
Instead of creating a projects method in the User model, I coded a method called self.find_by_user_id in the Projects model:

def self.find_by_user_id(userid)
    project_ids = ProjectsUsers.find_all_by_user_id(userid, :select => "project_id")
    projects = project_ids.collect { |projects_users| projects_users.project }
end

You can call it this way:

user_projects = Project.find_by_user_id(2)

And BOOM!, you have all projects for the user no. 2.

That’s all folks! This was my solution/workaround for integrating a REST-Resource via a many-to-many association in Rails. Hope you liked it. :-)

05.04.08

Rails and in_place_editor issues

Ok, so the last few days I had a bit of a struggle concerning the script.aculo.us in place editor and the corresponding plugin/helper in rails.
So here are my links that really helped me solving these issues:

If you have more interesting links regarding the in_place_editor and rails, feel free to leave a comment right here. Thanks.

11.03.08

More ER-Modelling

Once more, I improved the model of my application. I wasn’t satisfied with the fact, that I was indeed able to store the time report data for each day of the month, but have an UI on a monthly basis and so one screen for multiple DailyReports.
Now I modelled it the way, that I have a (monthly) TimeReport which has many DailyReports. This way a DailyReport belongs to a Project and a (monthly) TimeReport. And a TimeReport belongs to a specific user/employee.

That’s exactly how I wanted it to be from the beginning. I don’t no why this took me this long…

Now it’s also no problem to get nice URLs for a TimeReport. For example like this: http://…/TimeReport/DanielPietzsch/2008/3/ for March 2008.

28.02.08

Third (and probably last) time reporting mockup

Besides thinking about how to model my database I continued working on the UI:

Ok, maybe you don’t see that much difference since the last mockup, but I refined most of the div-structure beneath the surface and did some minor design changes.
But the biggest improvement is, that the calendar is now based on real dates. I must admit that the calendar helper plugin helped me with the code.

The bullet-points on the 28th are a representation for all calendar fields, where you entered any hours. If you didn’t enter an other number than 0 the day cell stays empty (for display). If you want the add or modify hours on a particular day, you click the cell and via an in-place editor you can enter your information. (That’s the plan).

I’m not quite sure if the coloring of the weekends will stay that way…I think I’ll decide later, since this is not the most important decision to make.

Now I think I should concentrate on the real app, meaning all the functionality and model behind the UI.

26.02.08

Altered ER-Model [UPDATE]

I altered a part of my ER-Model concerning the implementation of the time-reporting:

There’s no longer an entity called “Arbeitszeit” (working time). All the worked hours and days should now get stored in the extra many-to-many-table that’ll be created in between “Stundenzettel” (timesheet) and “Projekt” (project). That table might have the following attributes: StundenzettelID, ProjektID, workingTimeTotal, dailyTimes, notes.
So far I’m not sure how to store all the hours to their corresponding days in dailyTimes (because that’s at least about 30 values every month and user), but I might use a plain text field which contains a somehow-delimited list of working-hours (ascending from the 1st to the last day of the month).

The “Mitarbeiter” (co-worker) entity is also the applications entity for storing login- and user-information.

What you see on the latest mockup, is in Rails the update- or new-action/view for the “Stundenzettel”-controller. I think there won’t be any implementation of a read- or delete-action for “Stundenzettel” (timesheets).

So, I hope this will work for me…

And yes, next time the ER-Model will be in english, too, that I don’t have to bother you (and me) with this language mix. I also code in english, so this makes sense anyway.

[UPDATE]

After talking to Tim and Phillip and considering Stefans Comment, I think this is the right way of modelling the Entity Relationship:

So, in the DailyReport entity there is the attribute Date which is an additional primary key to the ProjectID and the UserID. This way the WorkedHours are stored for every day. So you have a table for every day, employee and project.
The same with notes. This may be useful to describe your tasks on that day, for example. This way I think I’ll have to reengineer the UI, ‘cause notes do not get stored on a monthly basis. I already have something in mind for that.

[/UPDATE]

22.02.08

Second UI mockup

The second mockup of the applications UI. I thought I stick to the design of innoq.com, so co-workers are somehow familiar with the layout. The (div-)structure underneath is quite different than the one of innoq.com, but I copied some design-elements so far.

Take a look:

In the top-right corner you now have the ability to add one or more projects you’re currently working on. They’ll be differentiated by colors. In the calendar you’ll find the corresponding fields for these projects. Again: I think I’ll hide most of these field in normal view, using an in-place editor.

I’m still really curious what your opinion is…

18.02.08

First UI mockup

As far as Unified Process is concerned, I already clarified some of the Business Modeling and Requirements a few month ago. See my blogposts here and here.

Well, I think I had a flash of inspiration: in order to “get real” I decided to start with the project. Isn’t that great?
And I decided to go with the UI first, because the first thing that comes to my mind is how the app will roughly look like. As a working title I called the app “innoVoice” (Yeah, it really is a great pun *cough*)

There you go:

That is the first screen for the colleagues out there in customer-projects for doing their time-reporting.
Ok, it is still made up of standard fonts, there are no fancy graphics etc., but I think it represents the image I have in mind when I think of that part of the app.
What bothers me a bit are all the input fields in the calendar. I think I’ll hide them using some AJAX in-place editors, so they won’t be that distracting.

I don’t really know what will be next. Either I start implementing this feature or I go for another UI-mockup. Maybe I’ll know more in one hour or so…

Stay tuned and feel free* to comment on the UI-mockup!

*actually, I would force you to comment, if I could!

03.01.08

Got Math?

Amy Hoy:

"No, [math is] not a prerequisite for most programming, and especially not web development as a whole. The more I watch people struggle with programming, the more I think that synthesis and intellectual flexibility are far more important skills than the ability to write small, isolated, brilliant bits of code."

Really good article and discussion on the link between math and programming skills.
Be sure to read the very interesting comments as well:

http://www.slash7.com/articles/2008/1/2/got-math

20.12.07

AJAX calls with fallback

When you have a list of - say - articles (that’s what I have here) and you want to change the order the items appear on the fly(maybe the newest ones first, or alphabetic or maybe clockwise…you name it…), then you have two possibilities:
The old way by providing a link that sends a “normal” request to the server which returns the same site again, with the difference of an alternated order of articles.
In rails this is pretty basic stuff:

<%= link_to 'Oldest ones first', :action => "index",
:sort_string => "created_at ASC" %>

The index-action in the controller then makes nothing different than before besides doing a database-query with the altered order-statement. And returns the site. Here the excerpt from the controller:

def index
if params[:sort_string]
    sort_string = params[:sort_string]
else
    sort_string = "created_at DESC" # the default sort order
end

@articles = Article.find(:all, :order => sort_string)
...

And there is the new cool, web 2.0 way: performing an AJAX call to the controller and just update the section of the page that needs to be updated. Without having to refresh the whole site. There you go:

<%= link_to_remote 'Oldest ones first', :url => { :action => "index",
:sort_string => "created_at ASC" }, :method => :get %>

This doesn’t work without two more lines of code. But that’s done with the blink of an eye.
In the index action of the controller you need to respond to the javascript format by adding this:

... # excerpt
respond_to do |format|
    format.html # index.html.erb
    format.js # index.js.rjs THIS LINE IS ADDED
    format.xml  { render :xml => @articles }
end
... # excerpt

Further you need to create a file with name index.js.rjs* in /app/views/YOURCONTROLLER/. Add the following line of code to this file:

page.replace_html :list, :partial => "list"

…where :list is the id of your div-element that contains the list of articles.
:partial => “list” calls the _list.html.erb partial (which contains that specific div).

The list must be wrapped in a div-element and the whole thing goes into _list.html.erb!!!
So just copy the code of the list you already have to the partial file and wrap everything in a div with id “list”. Then call the partial from that point where you removed it with <%= render :partial => “list” %>.

And then you’re done. When you hit the link, the list refreshes without loading the whole site again.

But wouldn’t it be nice to make this feature always work, even for browsers that have JavaScript disabled? I think so, ‘cause it guarantees that this works without relying on an enabled JavaScript setting. And that’s super-easy. Just modify the link in the view this way:

<%= link_to_remote 'Oldest ones first', {:url => { :action => "index",
:sort_string => "created_at ASC" }, :method => :get }, :href =>
url_for(:action => "index", :sort_string => "created_at ASC") %>

The only thing I had to add was two braces and the stuff following :href =>.
If JavaScript is enabled, the AJAX call will be send and otherwise it works as a “normal” call. Nice, heh?!?

But as you can see, the parameters passed are duplicates. The :url and :href hashes are quite similar. To DRY** things up, just write a small helper-method in application_helper.rb, that does this duplication for you:

def link_to_remote_with_fallback(name, options = {}, html_options = {})
    html_options[:href] = url_for(options[:url])
    link_to_remote(name, options, html_options)
end

And BOOM! The code’s DRY again:

<%= link_to_remote_with_fallback 'Oldest ones first', :url =>
{ :action => "index", :sort_string => "created_at ASC" } ,
:method => :get %>

Credits: DRYing up linktoremote for degradable URLs

*index is the name of the action in the controller. So modify this to match your action.
**DRY - Don’t repeat yourself

15.12.07

Doing AJAX-links right in Rails 2.0

Ok, maybe this is a trivial topic, but as this was my first “real” AJAX experience in Rails 2.0, I spent some time solving this issue:

I wanted to sort a list of articles differently using AJAX. So in the appropriate action of the controller I added the format.js line:

respond_to do |format|
    format.html # index.html.erb
    format.js
    format.xml  { render :xml => @articles }
end

And then I created a new view template in the view folder belonging to that controller: index.js.erb.
This was my first fault! The correct file extension is .js.rjs! First this didn’t make sense to me, but I got some explanation here: http://www.railsforum.com/viewtopic.php?pid=47149

And then - in my index.js.rjs template - I wrote the following line:

page.replace_html :list, :partial => "list"

This replaces the HTML of the div list with a rendering of the partial _list.html.erb. I never had any doubt that this line was correct. ;-)
So far so good, but I got really ugly results clicking a link_to_remote link:

<%= link_to_remote 'Oldest Articles first', :update => 'list',
:url => { :action => "index", :sort_string => "created_at ASC" }, :method => :get %>

The result was something like:

try { Element.update ...

…followed by more strange ruby code, mixed with some of my list data in between, replacing the list-div. Here I expected the newly rendered, resorted list.

The problem was the :update => ‘list’ statement. That way, the code was not interpreted as JavaScript and got directly inserted into the div-tag. And as you can see, I specified to div to be updated in the page.replace_html call in index.js.rjs.

So, the correct call of link_to_remote would be without the :update parameter:

<%= link_to_remote 'Oldest Articles first', :url => { :action => "index",
:sort_string => "created_at ASC" }, :method => :get %>

Problem solved!

In short:

  1. the right file extension for responding to JavaScript is .js.rjs
  2. when using link_to_remote with page.replace_html don’t use the :update parameter

As I said above, this is not such a big problem when done correctly, but sometimes it’s an accumulation of 2 or 3 little issues that turn into a big one. At least for me.

08.12.07

Rails 2.0 released

"This is a fantastic release that’s absolutely stuffed with great new features, loads of fixes, and an incredible amount of polish."

Check out more in DDHs Post:

Riding Rails: Rails 2.0: It's done!

27.11.07

Leopard Tech Talk Summary

My unedited notes from the Leopard Tech Talk at the Hilton Hotel Düsseldorf today.
As I’m not a Cocoa Developer with in-depth knowledge, I just wrote down some interesting points for me to get an impression of all the technologies available in Leopard and Mac OS X in general. For instance, I didn’t note any in-depth code examples, or all the new features of the Xcode tools.

1st Block

(Speaker: Paul Burford)

Resolution Independence

  • remove any resolution-dependend code
  • use Quartz Debug to increase resolution

Spotlight

  • need plug-in for own filetypes
  • automatic menu indexing in leopard
  • Spotlight runs with user-rights

64-Bit

  • 32- and 64-Bit applications coexist
  • Java 1.6 will support 64-Bit (on Intel) as well as Cocoa

Core Animation

  • originally developed for devices like the iPhone
  • not an animation engine
  • adds realism and valuable feedback to the UI
  • setup and forget about it (really easy to add to an existing application)

Time Machine

  • Backing up to a network-harddrive will be back in the future (they found a bug short before releasing Leopard)
  • you’re able to roll back to a previous state (before an OS-Upgrade for instance)
  • tell TM what files (of your application) shouldn’t be backed up
  • .tmp files are never backed up
  • backups are indexed by Spotlight
  • backs up forever until you run out of diskspace
  • so far no compression of backups

Dashboard

  • Widgets now execute in one process

Apple Script

  • Bridges for Python and Ruby

Objective-C 2.0

  • Garbage Collection
    • Build Settings -> Enable Garbage Collection
    • much more readable code
    • less code to maintain …
    • use -finalize instead of -dealloc
    • not available in Tiger

  • Properties

    • shortcut to get getter- and setter methods
    • @property NSString *name; -> creates these methods for you (yeah, really ruby-like ;-) )

Core Animation

(Speaker: Paul Burford)

Architecture

  • based on OpenGL
  • Access to all other graphic libraries (Core IMage, Quicktime, Quartz)

Cocoa Slides

  • Demo app
  • No blocking of UI (runs in a seperate thread)

  • implicit animation

  • you don’t have the app to tell it “do this animation now”
  • really easy to add to an existing app
  • set animation method (optional)
  • set duration

Overview

  • enhance the user experience
  • create meaningful motions that provide live feedback
  • examples: cover flow, moving items to dock, front row…
  • don’t confuse the user
  • don’t add constant motion
  • don’t add meaningless motion
  • only Objective-C (no Java support)
  • lots of layer properties to style your layer
  • layers are really lightweight (because originally designed for devices like iPhones)
  • your mac can handle thousands of layers flawlessly

Implicit Animations

  • superclass CAAnimation

    • CAPropertyAnimation
      • CABasicAnimation
      • CAKeyframeAnimation

    • CATransition
    • CAAnimationGroup

  • Built-in animation for grid views, scroll views, toll bars…

Spotlight & Quicklook

(Speaker: Paul Burford)

Spotlight

  • preview content in searches
  • new syntax
  • Spotlight plug-ins
    • declare set of handled file formats
    • start with spotlight plug-in template in xcode
    • edit info.plist

Early lunch break at 11:45h (the beamer went out of order)

Lunch was really great: A lot of nice Hilton-worthy food! Hm….

Spotlight (continued)

  • Spotlight for Help
  • Works for Cocoa and Carbon Apps

Quick Look

  • Preview vs. Thumbnails
  • Preview really usefull in cover flow view
  • thumbnail: low-res image, static image
  • preview: feihtful representation of your document, richer format (PDF, rtf etc.)
  • how to create previews
    • Preview saved as any native Quick Look type
    • pregenerate (at save time) or
    • create on demand (using a quicklook plug-in)

  • QL-Plugins are quite the same Spotlight-plugins (if you know one, you should be able to code the other)

Leopard Tech Talk

Xcode 3.0 and Interface Builder 3.0

(Speaker: Alberto Araoz)

Xcode 3.0

  • Repositroy-support (subversion etc.)
  • faster
  • code folding
  • code focus
  • improved syntax coloring

…lunch is taking its toll…

Interface Builder 3.0

*zZzzzzzzzzzzzzzzzz*

64-Bit Development in Leopard

(Speaker: Alberto Araoz)

*zZzzzzzzzzzzzzzzz*

Image Processing & Manipulation in Leopard

(Speaker: again Paul Burford)

Image I/O

  • 1 API for all different file formats and operations
  • preservs metadata (EXIF, Tiff etc.)
  • RAW support
  • floating point support
  • Floating POINT HDR Images
  • Thumbnails: 3 choices
    • generic OS thumb picture
    • small preview (rought sketched real content)
    • bigger preview (exact data thumb)
    • everything is stored in 32-bit floating point numbers

ImageKit

  • Components
    • Viewer
    • Edit Panel
    • Browser (pictures, movies, quick looks)
    • Picture Taker (use built-in camera, screenshot)
    • Slideshow
    • Others

  • New Panels for Core Image filters, so you don’t have to built your own for accessing the filters

Core Image

  • New in Leopard:
    • Adjusting RAW Images
    • Core IMage Filters do the work (every step configurable)

Unofficial stuff (said after finishing event)

  • Apple didn’t ship an iPhone SDK, simply because it was not ready
  • The first iPhone software was really ready just in time, with many processes running as root user
  • iPhone SDK next february

22.11.07

The preview feature and more updates on re-coding innoq.com

So now finally another post concerning the “real” work - meaning the progress on re-coding innoq.com.

I’m still working on the part of maintaining all the articles on the site. To be precise I did a lot of thinking about and coding the articles preview-feature, i.e. when you write a new article or edit an existing one, you can see a preview when clicking the appropriate button.

What took a quite huge amount of time was gathering all the possible alternatives on how to implement that particular functionality. Will the preview be displayed on the same page? Will this be done with or without AJAX? Or should the preview open in a new window or in the same window on a new page? Or is a separate page, embedded in an iframe-element, the best way to do it?
I decided to go with the “same-window-new-page”-variant, and here’s why:
The reason for displaying the preview on a separate page was, that I wanted the article to appear in the way it will appear on the actual webpage-frontend. Furthermore I really wanted to use the original stylesheet, and not a faked 2nd version just for the preview. I think that is easier to maintain and more consistent in case the original stylesheet will be altered. And: why not use the original show-method from the articles controller to display an articles preview? (actually I did implement an extra preview-method and -view-template, which are slightly modified copies of the show-stuff)
The reason for the “same-window”-part is that I don’t like new windows: so (even if they open in new tabs) when you do not close them, after a while you’ll have plenty of them and your screen gets cluttered*. And it is the same amount of work to close the window or hit a button or link taking you back to where you came from. Further this is more linear and user-friendly IMHO.

So this is what it looks like when editing an article:

Editing an article. Click to enlarge.

And this is how the preview looks like when you hit “Vorschau” (i.e. preview in german):

Previewing an article. Click to enlarge.

The giant link at the bottom will take you back to the edit-screen with javascript:history.back();.
I should mention that the preview does not save anything to the database. It is generated on-the-fly and so it takes all the fields of the form as parameters. It’s a GET-Request, so these parameters appear in the adressbar in your browser:

Adressbar

I’m not sure if I think that’s too ugly…maybe this deserves some improvement.

Another thing I implemented is a button for buffering (“Zwischenspeichern” in german). So you can save the article without being sent back to the index action. So far this is just an ordinary POST-Request, with reloading the whole page. Maybe it would be sexier to use AJAX, but it’s more difficult to implement and during a save you won’t be editing the article anyway, do you?

So that was my - a bit extensive - update on innoQonRails…comments are always welcome!

*Yes, I now you can give the window a name and each time you hit the button for the preview it will be loaded in that window. I don’t like that, either.

20.11.07

Make TextMate cope with Rails 2.0 filename convention

In Rails 2.0 view templates have an ending like .html.erb, .css.erb or .xml.erb (instead of f.i. .rhtml in Rails 1.2.x). So if you've selected a syntax highlighting in TextMate for - say a .html.erb template, this would apply to all templates with ending .erb (i.e. .css.erb etc.) and that's bad, because you want the .css.erb file to have another syntax highlighting (CSS!).

To fix this, you simply have to do the following:

  1. In the TextMate menu select Bundles -> Bundle Editor -> Edit Languages
  2. Expand the "Ruby On Rails" item
  3. Select "HTML (Rails)"
  4. Replace "fileTypes = ( 'rhtml' );" with "fileTypes = ( 'rhtml', 'html.erb' );"
  5. Redo this for every language you use (i.e. CSS -> css.erb, XML -> xml.erb...) in its corresponding menu
  6. Now you can select a separate highlighting for every .erb extension

(via Google Groups)

05.11.07

Rails Sammelsorium

Hier kleinere Rails-Codeschnipsel, die ich in letzter Zeit benutzt habe.

Form-Partial in Rails 2.0

Als ich mir den Scaffold für die einzelnen Artikel erstellt habe, wurde mir kein Form-Partial (_form.html.erb) erstellt, wie ich es aus Rails 1.2.3 kannte (dort hieß die Datei noch _form.rhtml). So stand der Code der Eingabe- und Editierform 2x im Code: einmal in new.html.erb und einmal in edit.html.erb.
Vorher fand' ich das irgendwie besser, da die Form für's Editieren und neu Hinzufügen die gleiche ist, und somit habe ich den alten Zustand wieder hergestellt.

Zuerst musste ich die Datei _form.html.erb erstellen. Dort kam dann der ganze Code der Form rein, bis auf den Button zum abschicken der Form.
Da in Rails 2.0 der form_for tag etwas anders aussieht...

<% form_for(@article) do |f| %>

...und die Abkürzung über die Variable f gegangen wird...

<%= f.text_field :title, :class => "text_field" %>

musste eben diese noch übergeben werden. Dies geschieht mit folgendem Zusatz im render-Aufruf des Partials:

<%= render :partial => "form", :locals => {:f => f} %>

Und so ist dann auch wieder alles ordentlich DRY.

Tabindex

Um einen Tabindex für Eingabefelder festzulegen, gibt es einfach die Option :tabindex

<%= f.text_field :title, :class => "text_field", :tabindex => "1" %>

Focus auf ein bestimmtes Feld setzen

Dazu legt man sich lediglich eine kleine Helper-Funktion z.B. in application_helper.rb an...

def set_focus_to_id(id)
    javascript_tag("$('#{id}').focus()")
end

...und ruft diese - nach dem end-tag der Form - wie folgt auf:

<%= set_focus_to_id "article_title" %>

Das ganze setzt voraus, dass die Prototype/Scriptaculous-Skripte eingebunden sind über

<%= javascript_include_tag :defaults %>

(via Wolfmans Howlings)

validates_presence_of mit habtm korrekt in update-Action

Hat man eine many-to-many Beziehung zwischen zwei Entitäten, wie sie z.B. habe mir Artikel und deren Kategorien...

has_and_belongs_to_many :categories # (in article.rb)
has_and_belongs_to_many :articles # (in category.rb)

...so gab es bei der Update-Aktion im articles-controller das Problem, dass die Zeile

 validates_presence_of :categories # (in article.rb)

keine Wirkung zeigte und Änderungen an den Kategorien (in meinem Fall mit Checkboxen dargestellt) nicht übernommen wurden. So musste noch folgende Zeile in der Aktion update in articles_controller.rb hinzugefügt werden:

@article.categories.clear if !params['article']['category_ids']

In der Form sieht das Ganze wie folgt aus:

<% for category in @categories %>
    <%= check_box_tag "article[category_ids][]", category.id,
    @article.categories.include?(category), :class => "checkbox" %>
    <%= " " + category.long_name %><br/>
 <% count = count + 1 %>
<% end %>

(via diverser Quellen, die ich nicht mehr zusammen bekomme ;-))

(Randnotiz: wenn ich mir so besonders meine letzte Überschrift in diesem Post so durchlese, frage ich mich manchmal, warum man sich es antut Posts auf deutsch zu schreiben!? Da ich grundsätzlich in Englisch programmiere, und mir eigentlich auch englische Code-Kommentare leichter von der Hand gehen, muss ich manchmal echt überlegen, wie ich das, was ich schreiben möchte, jetzt auf deutsch ausdrücke.)

27.10.07

Dynamic Stylesheets in Rails

Nach einem ersten Test-Deployment kam es noch zu einigen Fehlern, was relative Linkangaben anging, wenn man die Seite z.B. in einem anderen Verzeichnis ablegt.
Besonders Pfadangaben zu Bildern im Stylesheet machten Probleme. Da aber CSS-Stylesheets nicht dynamisch sind, habe ich erstmal die entsprechenden Angaben herausgenommen und inline in einem Template (application.html.erb) abgelegt. Dort konnte ich dann die entsprechende Dynamic reinbringen.
Das hat mir aber natürlich nicht gefallen, so viele Style-Angaben im Template zu haben, und so habe ich mich auf die Suche nach einer Lösung gemacht und bin auf folgenden Blogeintrag von Josh Susser gestoßen: http://blog.hasmanythrough.com/2007/10/18/simpler-than-dirt-restful-dynamic-css

Nach diesem Rezept bin ich dann quasi vorgegangen, um das Problem zu lösen. Ich musste es nur etwas anpassen, da meine Angaben überall verfügbar sein sollten - also application-wide.
Also habe ich erstmal ein view-template im Verzeichnis /app/views/application/ erstellt mit dem Namen "dynamic_stylesheet.css.erb".
Danach habe ich im Application-Controller (application.rb) folgende Methode implementiert:

def dynamic_stylesheet
    respond_to do |format|
      format.css
    end
end

Einfach eine Methode, die bei Anforderung eines Stylesheet entsprechend reagiert.

Des weiteren war es noch notwendig eine Route in routes.rb hinzuzufügen:

map.connect '/dynamic_stylesheet.:format',
:controller => "application", :action => "dynamic_stylesheet"

So war es dann schon möglich, das Stylesheet mit folgender URL direkt aufzurufen: http://localhost:3000/dynamic_stylesheet.css

Um das Stylesheet in einem view-template noch einzubinden, brauchte ich nur noch folgende Zeile hinzufügen:

<%= stylesheet_link_tag '/dynamic_stylesheet' %>

So sieht dann alles auch wieder schick aus und der Style-Kram ist wieder da, wo er hingehört. War in der Tat "Simpler than dirt"! Thanks to Rails 2.0!

18.10.07

Schriftgröße (font-size), CSS und verschiedene Browser

Wenn ihr euch schon immer mal gefragt habt (wie ich grade), wie man die Schriftgröße auf Webseiten browserunabhängig und benutzerfreundlich gestaltet, lege ich euch hiermit mal 2 Links ans Herz, die ich für recht nützlich empfunden habe:

  1. How to size text using ems
  2. Effective Style with em

Ein Argument für die Festlegung der Größe mittels em-tags ist, dass der IE keine Schriften mit Angaben mit px skalieren kann. Soweit ich weiss, wurde das in der 7er-Version behoben. Trotzdem finde ich die beiden Artikel sehr hilfreich und ich weiss jetzt warum in manchen Stylesheets die Schriftgröße (fast) ausschließlich in em angegeben ist.

17.10.07

Backend Layout

Ich bin dann jetzt mal wirklich beim Backend gelandet.
Dort angekommen, musste ich mich erstmal darum kümmern, dass die entsprechenden Templates (Edit, Index, New...) erstmal ein anderes Layout bekommen als die Webseite selber.

Zuerst dachte ich, ich könnte einfach Folgendes in den ArticleController schreiben und gut is...:

layout "backend", :except => [:show, :search]

Dem war aber leider nicht so. Denn anstelle, dass show und search weiterhin das Standardlayout verwenden, benutzten sie dann gar keins mehr. So musste ich noch folgende Zeile in den entprechenden Methoden hinzufügen/modifizieren:

format.html { render :layout  => "application" } # show.html.erb

So habe ich explizit festgelegt, welches Layout sie nutzen sollen. Das entspricht zwar nicht Convention over Configuration aber mir is bis jetzt nix besseres eingefallen.

Da ich momentan "Getting Real" lese, dachte ich, mach' ich es wie die Jungs und fange beim UI an. Der folgende Screenshot zeigt einen ersten Entwurf:

screenshot_backend1.png

Ich habe mit dem Layout für das Hinzufügen neuer Artikel angefangen, da dies erstmal die wichtigste Komponente des ganzen CRUD ist. Außerdem ist das edit-Template dann quasi auch direkt fertig.

Ok, es sieht im Moment sehr schlicht aus. Ich habe grundsätzlich erstmal das Stylesheet, welches mir das scaffolding generiert hat genommen. Ich habe dann nur den Hintergrund der Webseite eingefügt.
Ferner habe ich das Markdown Cheat Sheet von Mr. Markdown himself eingefügt. Ich glaube zwar, dass sich die bisherigen Autoren der Webseite gut mit der Markdownformatierung auskennen, aber wer weiss, wer da sonst noch mit arbeiten wird...Außerdem: sollte man eine Formatierung vergessen haben, kann man eben schnell nachschauen. Genug Platz ist auf jeden Fall da.

Die Eingabeform besteht nur aus den Feldern für Titel und Fliesstext sowie einer Auswahl in welche Kategorien man den Artikel stecken möchte. Das ist erstmal alles was man braucht. Ich habe mich dazu entschieden die optionalen Felder (Kurztitel und Zusammenfassung) per default ausgeblendet zu lassen, um 1. den Blick auf das Wesentliche zu richten und 2. die momentane Situation so ist, dass die wenigsten Artikel einen Kurztitel und/oder Zusammenfassung besitzen.
Alle anderen Felder für einen Artikel werden automatisch generiert. Diese müssen also (erstmal) nicht auf der Maske erscheinen.

Ich denke so kann man erstmal damit arbeiten. Was ich allerdings vielleicht noch einfüge ist ein Header mit dem innoQ-Logo, damit man auch weiss, wo man sich hier befindet.

14.10.07

innoq.com: Suche mit GET

Ok, ich bin dann doch erstmal wieder beim Frontend gelandet. Irgendwie mag ich es nicht, wenn Dinge so halbfertig sind, besonders wenn es nur "Kleinigkeiten" sind. Und so habe mich dran gemacht, die bisher schon implementierte Suche (mittels acts_as_ferret plugin), anstatt mit POST, mit GET und somit REST-konform umzusetzen.

Für die Sache musste ich dann ein extra Route in routes.rb eintragen und schon funktionierte es! :-) Naja, ok...ein bisschen nachdenken musste ich schon vorher. Aber ich denke das Ergebnis, sprich der in der Adresszeile übergebene String, macht Sinn und man kann anhand der URL verstehen, was abgeht:

suche_screenshot.png

Ich habe mich bei der Benennung des Suchparameters für die lange Version ("query=") entschieden, da man so besser nachvollziehen kann, was gemeint ist. Die Kurzfassung ("q=" z.B. bei Google) ist einfach nicht so sprechend. Und zusätzlich ist der Quellcode auch verständlicher. Ferner habe ich den title-tag der Ergebnisseite angepasst, so dass der Titel nun auch besagt, dass man gesucht hat und wonach man gesucht hat. Somit lässt sich die Seite dann auch bequem bookmarken.

04.10.07

Lesbarer Quellcode

"IMHO ist lesbarer Code wesentlich besser, vor allem, was die Wartbarkeit angeht. Und wenn man dafür die doppelte Anzahl Codezeilen benötigt..."

Das habe ich in einem Post vor einiger Zeit geschrieben, und bekomme nun eine kleine Bestätigung von jemandem, der mehr Erfahrung hat. Koz vom Rails Core Team schreibt auf therailsway.com:

"While the refactored version may have more lines of code, but don’t let that scare you. It’s far more important for code to be human readable than incredibly concise."

Genau meine Meinung! Ob ich mich selber immer daran halte steht auf einem anderen Blatt... ;-) Ich finde in dem kurzen Post ist ein sehr schönes Beispiel angegeben. Solchen Code mag ich.

Der Link: http://www.therailsway.com/2007/10/4/many-skinny-methods

01.10.07

Suche mit acts_as_ferret

Da auch die Suche der innoq-Webseite neu gecoded werden muss, habe ich mich da auch nach einer Lösung umgesehen und bin auf das Plugin acts_as_ferret gestoßen.

Auch zu diesem Plugin gab's ein Tutorial von railsenvy.com. Und zwar hier: http://www.railsenvy.com/2007/2/19/acts-as-ferret-tutorial

Und es ist in der Tat so einfach, wie es in diesem Tutorial beschrieben ist. Coole Sache.

30.09.07

Rake me slugs!

Da die URLs nachwievor "schön" sein sollen, hatte ich das Problem, dass für die einzelnen Artikel einer Kategorie (Leistungen, Referenzen etc.) noch keine slugs (Kurznamen) hinterlegt waren. Und diese slugs tauchen eben in der Adresszeile auf und sie sollen als Navigationsgrundlage dienen.
Wie generiere ich mir also am besten eben solche?
Da der slug in Zukunft direkt beim Erstellen eines neuen Artikels generiert wird, hat im Prinzip die Generierung für bereits vorhandene slugs nix mit meiner Anwendung zu tun.
Dazu wollte ich dann rake benutzen. Da ich Befehle wie rake db:migrate o.Ä. bereits kannte, dachte ich mir wird das damit bestimmt schön zu lösen sein...
Und so war's dann auch. Zu meinem Glück hatten die Jungs von railsenvy.com gerade ein rake-Tutorial veröffentlicht. Dieses kann ich nur empfehlen, wenn man sich noch nicht mit rake auseinandergesetzt hat: http://www.railsenvy.com/2007/6/11/ruby-on-rails-rake-tutorial

Und ich muss sagen, es ist wirklich ziemlich einfach gewesen ein kurzes Skript zu schreiben, um mir sämtliche slugs generieren zu lassen:

namespace :db do
  desc "Creates a slug for each article in the database, based on
           its title"
  task(:create_slugs => :environment) do
    articles = Article.find(:all, :conditions => { :slug => nil })
    articles.each do |article|
        article.update_attribute("slug", article.generate_slug
                                            (article.title))
    end
  end # of task do
end # of namespace do

Und schon hatte ich alles zusammen und konnte weiterarbeiten.
Zur Erläuterung: die Methode generate_slug() entfernt alle Sonderzeichen etc.

27.09.07

HTML-Tags aus einem String entfernen mittels regulärem Ausdruck [UPDATE]

Mein erster Kontakt mit Regulären Ausrücken: ich wollte - im Rahmen der neuen innoq-Webseite - aus einem String sämtliche HTML-Tags entfernen.

Bevor ich direkt nach einer fertigen Lösung suche, dachte ich mir probierst du das mal selbst aus, und dabei bin ich auf 2 ganz nützliche Online-Tools gestoßen, die einem helfen Regular Expressions zu überprüfen:

  1. reWork: Mit diesem Tool kann man einen regulären Ausdruck gegen einen bestimmten Text Prüfen. Sehr nützlich, vor allem, weil er auch für gewisse Aufgaben direkt den Code ausspuckt. So gibt er Ruby-, Javascript-, Python- und PHP-Code aus und liefert auf Wunsch auch direkt die Syntax für eine spezielle Aufgabe aus, wie z.B. das ersetzen eines Teilstrings.

  2. txt2re: Hiermit kann man quasi umgekehrt vorgehen und sich seinen regulären Ausdruck für einen bestimmten Textpattern zusammenstellen. Nicht so schick, und auch nicht wirklich vollständig, aber es hilft einem einen Ansatz zu finden, wenn man eigentlich keine Ahnung hat.

Naja, nach einiger Rumprobiererei hab ich's leider nicht ganz hinbekommen einen passenden regulären Ausdruck zu finden, obwohl die Lösung, die ich dann genommen habe sehr einleuchtend ist:

<[^>]*>

Also mein Code-Schnipsel sieht dann so aus:

item.markdown_content.gsub(/<[^>]*>/, '').to(250)

[UPDATE]: Ich kann auch wieder ein Cheat Sheet von Dave Child empfehlen: http://www.ilovejackdaniels.com/cheat-sheets/regular-expressions-cheat-sheet/

20.09.07

PrettyURLs

Die "neue" innoQ-Homepage soll auch nachwievor schöne URLs haben, sog. PrettyURLs. Die Hauptnavigation der Seite besteht aus verschiedenen Kategorien, wie z.B. "Leistungen", "Referenzen" usw. Siehe auch folgenden Ausschnitt: Bild%202.png

In der Anwendung ist es so modelliert, dass jeder Link eine Kategorie repräsentiert. Somit hat man also einen Controller categories. Gemäß dem Standard in Rails werden diese Kategorien also über Links also z.B. über /categories/3 aufgerufen, wobei categories der Controller ist und 3 die entsprechende ID. Wie bekommt man es aber hin, dass man das Selbe mit einer PrettyURL hinbekommt, also z.B. /leistungen/?

Zunächst muss ich noch erzählen, dass in der Datenbank für jede Kategorie neben dem "schönen" Namen (long_name), welcher auch Sonderzeichen enthalten kann, auch einen "slug", einen Kurznamen, für jede Kategorie gibt. Dieser beinhaltet keine Sonderzeichen und ist quasi URL-freundlich.

Jetzt sollte man zunächst eine entsprechende Route anlegen, die dafür zuständig ist, die URL korrekt umzusetzen. Dies geschieht in routes.rb im config-Verzeichnis:

map.connect ':slug', :controller => "categories", :action => "show"
:slug speichert eben solchen. Also z.B. "leistungen" oder "Referenzen". Über :controller und :action wird dann gesagt, was damit passieren soll. In der Action show im categories controller passiert dann folgendes:
if params[:id] 
  @category = Category.find(params[:id])
else
  @category = Category.find(:first,
                      :conditions => { :slug => params[:slug] })
end

@path = "../" 

Der erste Teil der Anweisung ist dafür da, dass Standard-Rails-Weg immer noch funktioniert. Im else-Zweig wird dann einfach statt nach der ID nach dem entsprechenden slug in der Datenbank gesucht. @path wird den Links vorrangestellt, da man ja, wenn man in eine der Kategorien navigiert, eine Hierarchiestufe tiefer ist als bisher und man somit erst wieder eine Stufe nach oben navigieren muss, damit der Link stimmt.

Das war es dann auch fast schon. Jetzt muss man nur noch die Links in der View anpassen:

    <= link_to category.long_name, @path + category.slug + "/" >
< end >

(die %-Zeichen müsst ihr euch denken. Hab's nicht hinbekommen, die drinzulassen, ohne das der Code verschwindet). Also im Prinzip eigentlich ganz einfach, nur finde ich sind die Routes, also map.connect etc., relativ wenig dokumentiert.

Was ich wahrscheinlich als nächstes implementiere ist der Fall, dass eine ungültige URL angegeben wird.

Wie findet ihr die Lösung? Ist die so in Ordnung, oder bekommt man das Ganze noch eleganter hin?

19.09.07

Das "Wie erstelle ich ein neues EdgeRails Projekt"-Tutorial

Die innoq-Webseite soll auf Ruby On Rails portiert werden. Zu diesem Zweck nutze ich EdgeRails. EdgeRails ist die aktuellste Entwickler-Revision von Rails, die Features enthält, die wahrscheinlich in einer der nächsten Rails-Versionen implementiert werden. Mehr dazu gibt's auch hier: http://wiki.rubyonrails.org/rails/pages/EdgeRails

Unter dieser Adresse findet man zwar auch eine Anleitung dafür, wie man eine bestehende Rails-Anwendung unter EdgeRails laufen lassen kann, aber eben nicht, wie man eine komplett neue EdgeRails-Anwendung erstellt. Und genau das möchte ich hier erläutern. Zumdindest für Unix-Systeme (Mac OSX, Linux etc.). Windows-User müssen die Befehle entsprechend anpassen. Subversion muss installiert sein für dieses Tutorial. Subversion gibt's hier: http://subversion.tigris.org/

Deine aktuelle, systemweite Rails-Installation ist nicht betroffen und wird nicht überschrieben o.Ä. Du kannst weiterhin "normale" Rails-Anwedungen erstellen, wie bisher.

Auf ins Terminal und los geht's:

1. Wechsel in das Verzeichnis in welchem du das Projekt anlegen möchtest. Z.B. so:

cd RubyOnRailsProjects/

2. Die neuste EdgeRails-Version mittels Subversion auschecken und im Ordner rails speichern:

svn co http://dev.rubyonrails.com/svn/rails/trunk rails

Jetzt musst du einen Moment warten, bis der ganze Kram runtergeladen ist.

3. Lege ein neues EdgeRails Projekt an:

ruby rails/railties/bin/rails dein_edge_projekt

Der Projektordner (hier: dein_edge_projekt) wird angelegt inkl. der entsprechenden Struktur und den entsprechenden Dateien.

4. Verschiebe den rails-Ordner nach ./dein_edge_projekt/vendor/

mv rails ./dein_edge_projekt/vendor/

Für rails-Befehle wie z.B. script/generate scaffold article wird dann immer die Dateien unter vendor/rails genommen. Es kommt quasi einem rake:freeze:edge gleich, nur das die Dateien nicht erneut runtergeladen werden.

Das war's!

Viel Spass mit deiner EdgeRails Anwendung.

Für Verbesserungsvorschläge, Lob, Kritik etc. könnt ihr gerne die Kommentarfunktion nutzen. ;-)

05.09.07

RM-Install

rm-install.png

RM-Install, powered by BitRock, is a free, multi-platform, enterprise-class Ruby on Rails stack enabling you to instantly begin developing and deploying great Rails applications without the worry of installing or maintaining the various integrated software components.

Sicherlich einen Blick wert, wenn man eine komplett neue Entwicklungsumgebung aufsetzt. Folgende Dinge sind dabei:

Ruby 1.8.6
Rails 1.2.3
MySQL 5.0
SQLite 3.3
Subversion 1.4
Apache HTTP Server 2.2 (Production mode)
OpenSSL
ImageMagick 6.3
Mongrel/Mongrel Cluster
Capistrano
Gruff
Rake
RMagick

Sieht schonmal recht komplett aus, wie ich das mit meinen Anfängeraugen beurteilen kann. Das Ganze ist demnach auch nicht wirklich leichtgewichtig mit seinen 430 MB.

Im Moment ist es nur für Linux- und MacOSX-Systemen mit Intel-Prozessoren verfügbar, andere Systeme sollen aber in Kürze auch unterstützt werden.
So muss ich mich noch etwas gedulden, um den Kram ausprobieren zu können, da mein Powerbook eben ein Powerbook ist und nen G4 PowerPC verbaut hat.

Hier der Link: http://www.fiveruns.com/products/rm/install

25.08.07

Flog Score

"Flog shows you the most torturous code you wrote. The more painful the code, the higher the score."

Damit ist eigentlich alles gesagt! Hier der Link: http://ruby.sadi.st/Flog.html

Die Score des Codes aus dem Posting zuvor:

ss1.rb:20: warning: `&' interpreted as argument prefix
Total score = 38.8476045651339

main#none: (11.9)
     2.7: assignment
     1.9: to_a
     1.7: flatten
     1.6: name
     1.5: map
     1.5: branch
     1.3: []
     1.3: find
     1.1: pp
     1.1: new
SecretSanta#initialize: (6.7)
     3.9: assignment
     2.8: dup
     1.3: shuffle!
     1.3: assign!
SecretSanta#no_two_indices_are_alike: (5.2)
     4.2: assignment
     1.4: ==
     1.3: branch
     1.3: all?

Und die von meinem Code:

Total score = 64.3800571683191

main#assign_santas: (27.4)
     7.0: assignment
     6.8: branch
     5.3: personal_santa
     4.7: can_be_santa_of?
     3.8: length
     3.4: rand
     2.4: each
     1.7: []
     1.5: swap_santas
     1.5: select
     1.3: delete_at
main#none: (23.6)
    10.0: assignment
     7.7: new
     3.2: personal_santa
     2.8: firstname
     2.8: lastname
     1.4: email
     1.2: puts
     1.1: each
     1.1: assign_santas
     1.1: branch
"Total score = 64.3800571683191"

Es war mir eine Ehre euch gequält zu haben...

21.08.07

Noch viel zu lernen?!?

Da bin ich grade über folgenden Ruby-Code zum Thema "Secret Santas" gestoßen und war recht beeindruckt, wie kurz dieser ist:

class Array
  def shuffle!
    replace sort_by { rand }
  end
end

class SecretSanta
  include Enumerable

  def initialize(people)
    @from, @to = people.dup.shuffle!, people.dup
    assign!
  end

  def assign!
    @to.shuffle! until no_two_indices_are_alike
  end

  def each(&block)
    @from.zip(@to).each &block
  end

private
  def no_two_indices_are_alike
    all? { |a, b| a != b }
  end
end

s = SecretSanta.new(Person.find(:all))
# Print Secret Santa pairings
pp Hash[*s.to_a.flatten.map {|person| person.name}]

Nur verstehen tue ich bis jetzt wenig. Mal sehen, ob sich das in nächste Zeit ändert, aber abgesehen davon, bin ich kein Fan von solchem sehr kompakten Code. Ich weiss ja nicht ob Ruby-Spezialisten sowas auf anhieb lesen können (auch, wenn sie nicht wissen, welches Problem gelöst werden soll), aber ich könnte es nicht. IMHO ist lesbarer Code wesentlich besser, vor allem, was die Wartbarkeit angeht. Und wenn man dafür die doppelte Anzahl Codezeilen benötigt...

Oder ist ultrakompakter Quellcode erstrebenswert?

17.08.07

The secret santas on rails

Als erstes - zugegebenerweise recht kleines - Rails Projekt bin ich grade dabei die Secret Santa Anwendung mit Rails umzusetzen. Hauptsächlich um mal zu lernen, wie der ganze Krempel in Rails so zusammenhängt und um erste Erfahrungen an einem simplen Beispiel zu sammeln.

Und ich muss zugeben, da war ich bis jetzt schon gut beschäftigt. Eigentlich ist das ja eine kleine Anwendung, aber irgendwie hab ich schon für's Grundgerüst rel. lange gebraucht (wesentlich länger als für die reine Ruby Anwendung).

Meine Hauptprobleme waren erstmal weiter mit der Syntax klar zukommen (wann nehme ich person.id, wann :id zur Übergabe von Parametern etc. - ich weiss nicht, ob ich das schon 100%ig gerafft habe), wie ich richtig auf Zeilen oder Felder in meiner Datenbank zugreife (Stichwort .find) und wie er einen Datenbankabfrage aller Datensätze in einen Array packt (nämlich als Hash - also hat man einen Hash in einem Array - im Nachhinein schon logisch, aber man muss sich erstmal dran gewöhnen) und wie ich dann auf diesen zugreife.

Naja, die signifikanten Codeauschnitte sehen dann so aus:

Die Klasse einer Person:

class Person < ActiveRecord::Base  
  has_one :person

  #do you have a correct santa assigned?
  def has_correct_santa?
    lastname != Person.find(person_id).lastname
  end

  #can one person be the santa of other?
  def can_be_santa_of?(other)
    lastname != other.lastname
  end

  #return the object behind the person_id
  def personal_santa
    Person.find(person_id)
  end
end

Die Methode swap_santas:

#switches the two personal_santas of the passed people
  def swap_santas (person1, person2)
    person1.update_attribute("person_id", person2.person_id)
    person2.update_attribute("person_id", person1.person_id)
  end

Die Methode assign_santas:

#assigns each person his secret santa
  def assign_santas
    @people = Array.new
    @people = Person.find(:all)
    @santas = Array.new(@people)
    @people.each { |person| 
            person.person_id = 
@santas.delete_at(rand(@santas.length)).id #assigns santas randomly
            person.update_attribute("person_id", person.person_id)
          }

    @people.each { |person| 
      unless person.has_correct_santa?
        candidates = @people.select { |p| 
p.personal_santa.can_be_santa_of?(person)
 && person.personal_santa.can_be_santa_of?(p) } #finds possible candidates for a swap
        swap_santas(person, candidates[rand(candidates.length)])
      end
      }
    flash[:notice] = 'The secret santas have been assigned!'
    redirect_to :action => 'list'
  end

So funktioniert es im Moment auf jeden Fall, aber das ist keine gute Lösung. In dieser Version habe ich definitiv mehr Datenbankzugriffe als nötig sind. Ich sollte besser nur einmal die Daten aus der Datenbank holen und dann mit diesen Werten arbeiten bis die Partner korrekt zugewiesen sind und dann den Kram in die Datenbank zurückschreiben (so werden die Daten 2x geschrieben: einmal beim zufälligen zuweisen und dann nochmal bei der ggf. notwendigen Korrektur). Oder nicht?

Naja, ich denke das werde ich noch verbessern und mir dann auch mal angucken, wie das mit Stylesheets und Javascript in Rails gemacht wird.

14.08.07

Learning Ruby: The secret santas [Update]

Da ich grade dabei bin Ruby zu lernen, möchte ich mal ein kleines Programm zeigen und Probleme auflisten, die ich damit hatte.

Auf rubyquiz.com gibt es sehr viele Aufgaben, die man mit Ruby lösen kann und soll. Ich kann diese Seite nur empfehlen. Von dieser stammt auch das folgende Problem: Secret Santas.

Zu deutsch würde man das wohl als "Wichteln" bezeichnen. So werden gegenseitig zufällig Wichtelpartner zugeordnet. Die Einschränkung ist, dass Personen aus der selben Familie nicht gegenseitig zugeteilt werden dürfen.

Nachdem ich das Grundgerüst relativ schnell stehen hatte und zumindest teilweise das Problem mit den gleichen Nachnamen gelöst hatte, bestand am Ende das Problem, dass manchmal noch eine Person zugeteilt werden musste, diese aber den gleichen Nachnamen hatte, wie die Person, der noch der Wichtelpartner fehlte.

So habe ich mich auf die Suche nach einer Lösung gemacht, und meinte das Problem mathematisch lösen zu können/müssen (Stichwort: Permutationen).

Nachdem ich absolut nicht auf den grünen Zweig gekommen bin, habe ich dann doch mal in die Lösung geguckt. Eine elegante Lösung ist der Hill Climbing Algorithmus. Hier werden die Wichtelpartner zunächst einfach zufällig zugewiesen und am Ende wird die Liste der Personen mit ihren Partnern durchgegangen und ggf. falsche Übereinstimmungen (gleicher Nachname) durch vertauschen der jeweiligen Partner gelöst.

Also war's doch etwas unkomplizierter, als ich es mir vorher vorgestellt hatte. Meine Lösung:

[Update:] Bei der Suche nach geeigneten Kandidaten für einen Tausch der Partner, muss auf jeden Fall noch folgender Ausdruck nach dem && hinzugefügt werden:

people.select { |p| p.personal_santa.can_be_santa_of?(person)
&& person.personal_santa.can_be_santa_of?(p) }

Ansonsten kann es trotzdem vorkommen, dass falsche Wichtelpartner zugeordnet werden.

class Person
  attr_writer :personal_santa
  attr_reader :firstname, :lastname, :email, :personal_santa

  def initialize (firstname, lastname, email)
    @firstname = firstname
    @lastname = lastname
    @email = email
  end

  def can_be_santa_of?(other)
    @lastname != other.lastname
  end
end

#switches the two personal_santas of the passed people
def swap_santas (person1, person2)
  temp = person1.personal_santa
  person1.personal_santa = person2.personal_santa
  person2.personal_santa = temp  
end

#assigns each person his secret santa
def assign_santas(people, santas)
  people.each { |person| person.personal_santa = santas.delete_at
(rand(santas.length)) } #assigns santas randomly
  people.each { |person| 
    unless person.personal_santa.can_be_santa_of? person
      #finds possible candidates for a swap
      candidates = people.select { |p|
p.personal_santa.can_be_santa_of?(person)
&& person.personal_santa.can_be_santa_of?(p) }
      swap_santas(person, candidates[rand(candidates.length)])
    end
    }
end

person1 = Person.new("Daniel","Pietzsch","[email protected]")
person2 = Person.new("...") #parameter in the above format
person3 = Person.new("...")
person4 = Person.new("...")
person5 = Person.new("...")
person6 = Person.new("...")

people = [person1, person2, person3, person4, person5, person6]
santas = Array.new(people) #Copy of the people array

assign_santas(people, santas) #assigns each person his secret santa

#output
people.each {|person| puts "#{person.firstname} #{person.lastname}:
<#{person.email}>\nPersonal Santa: #{person.personal_santa.firstname}
#{person.personal_santa.lastname}\n\n"}

About

DanielHi. I'm Daniel Pietzsch and this is my innoQ-Blog. I'm a 26y old student at FH Bochum and working student at innoQ.
In this blog I mainly write about the progress concerning my diploma thesis which will be an in-house application for innoQ based on Ruby on Rails, but some other (geek) stuff might appear here, too.

daniel [dot] pietzsch [alt-L] innoq [dot] com

I recommend

Categories

Recent Comments

License

Creative Commons License This weblog is licensed under a Creative Commons License.
Powered by
Movable Type 3.31