
It works on my machine
Everyoneat some point in time...
We all know that feeling: we just worked our hardest to implement a feature for our web application and it works without problems locally on our machine. Then, once we push it to our build server… 💥 BOOM 💥
It could have been anything. But in this post, I want to describe one of the problems that I have had and describe a setup for testing the problem locally.
OpenID Connect (OIDC) is a spec which provides an identity layer over the top of OAuth 2.0 to allow authentication and single sign-on (SSO) for applications which all speak to the same authentication server (the OIDC server). At a recent OIDC workshop here at INNOQ, I did some sketchnotes which you can see here and here if you are interested.
I have been tasked several times with integrating an OIDC client into an application in order to provide authentication and authorization. This is easier said than done. There are a few OIDC client libraries available. A colleage and I tried to integrate it into our application and everything worked locally, but as soon as we deployed… 💥 BOOM 💥
We got an error in our browser telling us that there were too many redirects. What was going on?
The problem is that the application was being deployed into a cluster where
there were multiple instances of the application running behind a load balancer.
Our application was essentially stateless, but when you are performing
authentication, a certain amount of state is inevitable. In particular,
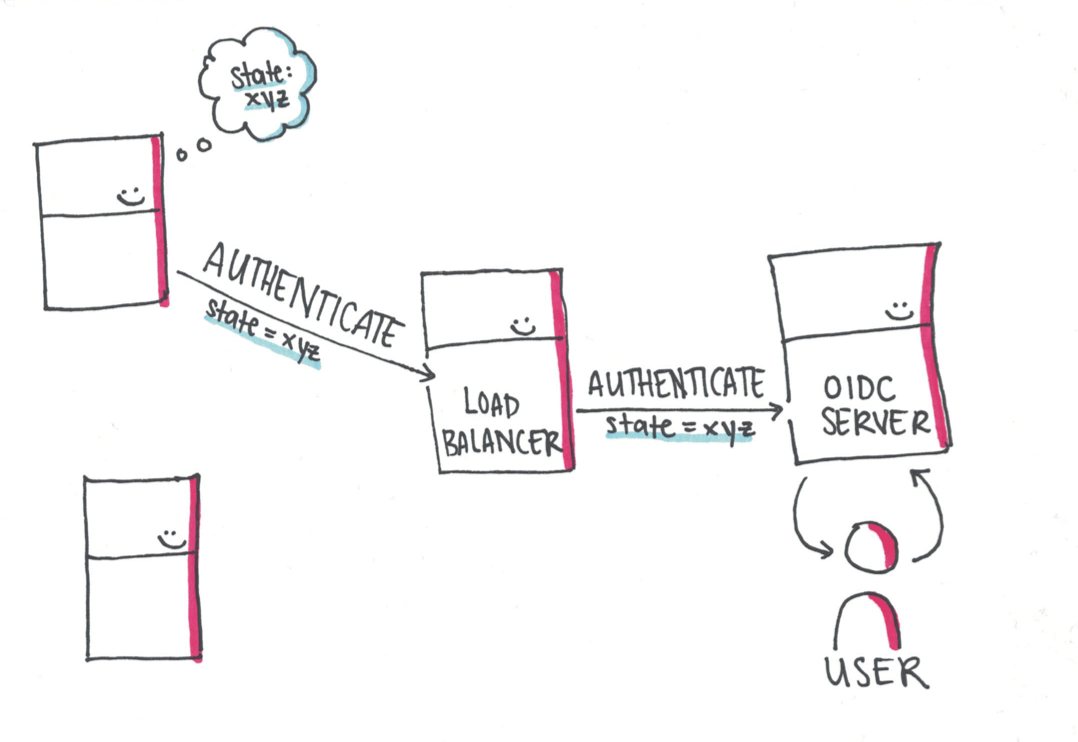
when you send a request for authentication to an OIDC server, there is a
recommended state parameter which is used to correlate the client request with
the server response. If the client implementation doesn’t recognize the state
parameter which is returned by the server, the client will restart the
authentication flow again.
But what happens when a load balancer is sitting in between your application and the OIDC server? The OIDC flow starts when a server sends an authentication request.
If there is a load balancer, there is a high likelihood that the instance of the application which started the authentication request will not be the instance which receives the redirect back from a successful user authentication.
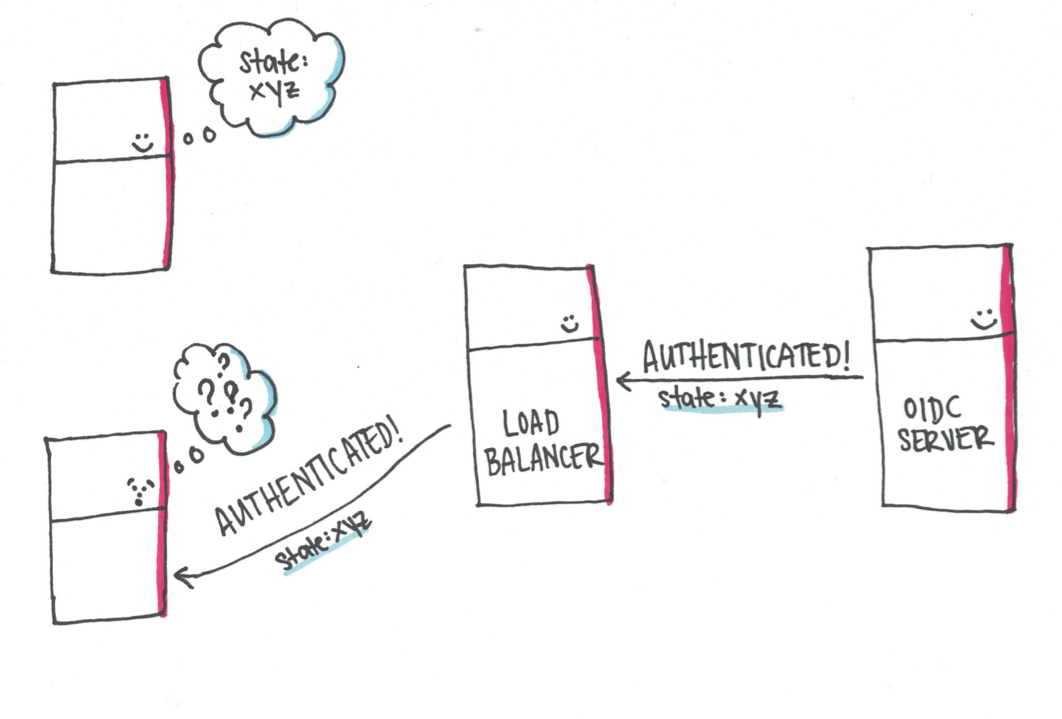
The client will then say «I don’t understand this» and try to validate again, sending the user back to the OIDC server with a new state.
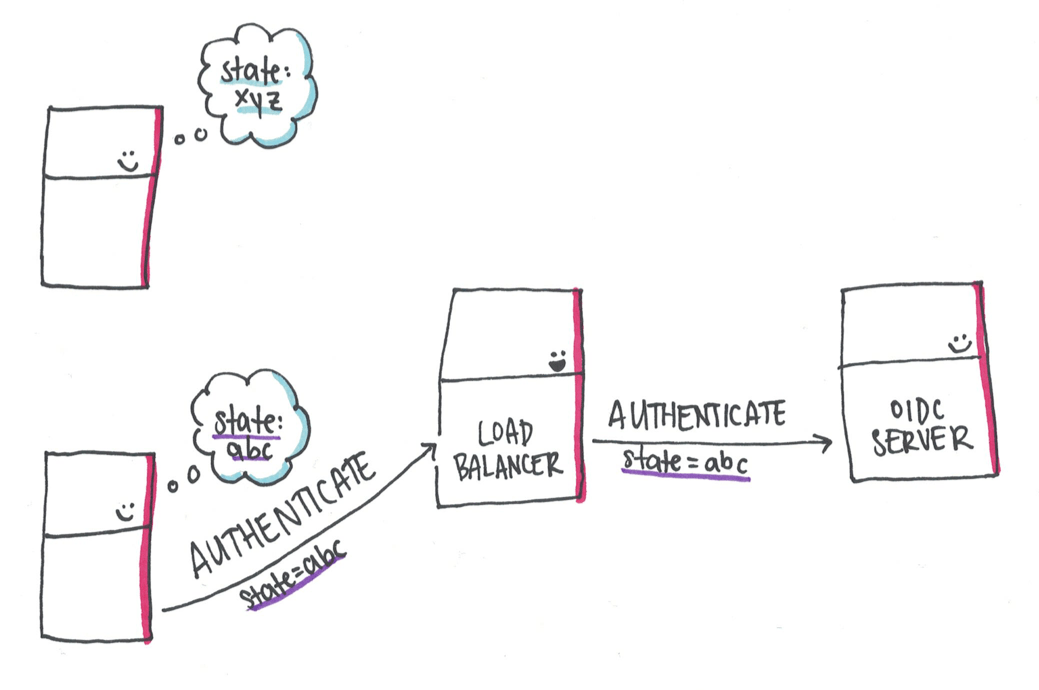
The OIDC server knows the user and sends another redirect back to the application. This redirect circus will continue until one of the following occurs: the redirect from the OIDC server happens to land at the same instance which sent the authentication request or the browser throws an error after too many redirects have occurred.
There are a few ways to solve this problem: persisting the user session between instances, using sticky sessions, or letting a reverse proxy perform the OIDC flow for you and pass the authentication information in a header. All of these have tradeoffs, but in here I want to focus on how I set up an environment locally to test the different options that I wanted to try out. If you are struggling with the same problem, this setup can help you try out your solution locally before deploying it to your cluster.
Setting up an OIDC server locally
Luckily, in the age of Docker it is relatively easy to set up the environment that we need for testing. The first step was to pick an OIDC provider which I can set up locally. I chose Keycloak.
This code will start a Keycloak server in a Docker container with the name
test-keycloak
docker run -p 7777:8080 --name test-keycloak \
  -e KEYCLOAK_USER=user \
  -e KEYCLOAK_PASSWORD=password \
  -e DB_VENDOR=H2 \
  -d jboss/keycloak
We then want to create a client in our Keycloak which has the client ID
myclient. We want to also configure the redirect URL to point to the load
balancer which will be running in front of our application
(e.g. http://localhost).
We can do that with the command-line utility kcreg. To set up a client, we need
to write the following script (here saved to a file called setup-client).
#!/bin/sh

keycloak/bin/kcreg.sh config credentials \
  --server http://localhost:8080/auth \
  --realm master \
  --user user \
  --password password
keycloak/bin/kcreg.sh create \
  -s clientId="myclient" \
  -s 'redirectUris=["http://localhost:/*"]'
keycloak/bin/kcreg.sh get "myclient" | jq '.secret'
This script then needs to be copied into our Docker container and executed.
### `setup-client` is the script we created in the last snippet
docker cp setup-client test-keycloak:/opt/jboss/setup-client

docker exec test-keycloak /opt/jboss/setup-client
Setting up the load balancer
Once we have performed these two steps to setup our OIDC server, we can set up a load balancer in front of our application. To do this, we can use an NGINX config file.
Save the following to a file ngnix.conf:
user  nginx;
worker_processes  1;

error_log  /var/log/nginx/error.log warn;
pid        /var/run/nginx.pid;


events {
    worker_connections  1024;
}

http {
    upstream myapp1 {
        server host.docker.internal:PORT1;
        server host.docker.internal:PORT2;
        server host.docker.internal:PORT3;
    }

    server {
        listen 80;

        location / {
            proxy_pass http://myapp1;
            proxy_set_header Host $host;
        }
    }
}
This is a config for starting a load balancer in front of three instances of an
application that are started on your local machine. You need to add an entry to
upstream myapp1 for each instance of your application that you have started.
The placeholder PORTX should be set to the port that the instance of your
application is running under.

Once you have updated this configuration file, you can start an NGINX in a
docker container with the name oidc-nginx:
#!/bin/bash

NGINX_CONF= ### SET ME TO THE ABSOLUTE PATH OF YOUR NGINX CONFIG FILE!! ###

docker run -d -p80:80 --name oidc-nginx -v $NGINX_CONF:/etc/nginx/nginx.conf:ro nginx
Here you need to specify the absolute path of the NGINX config file to copy it into the docker container.
Once you’ve created this setup, you have two docker containers which can be started and stopped in order to test how your application will behave behind a load balancer.
I’ve collected these scripts here, so feel free to take a look and play around with the config!